In this post, I will write up some notes about my JS1k entry ‘Train Window’, a view of a passing procedural landscape from a train window in 1kb of javascript.
Last year I participated for the first time in the JS1k competition with my entry ‘Minecraft.’ I enjoyed optimizing a short piece of code and discovering that – if you keep looking – the possibilities of adding new features by making your code more compact seem almost endless. This year I wrote a demo using high-level canvas functions. My entry ended fourth.
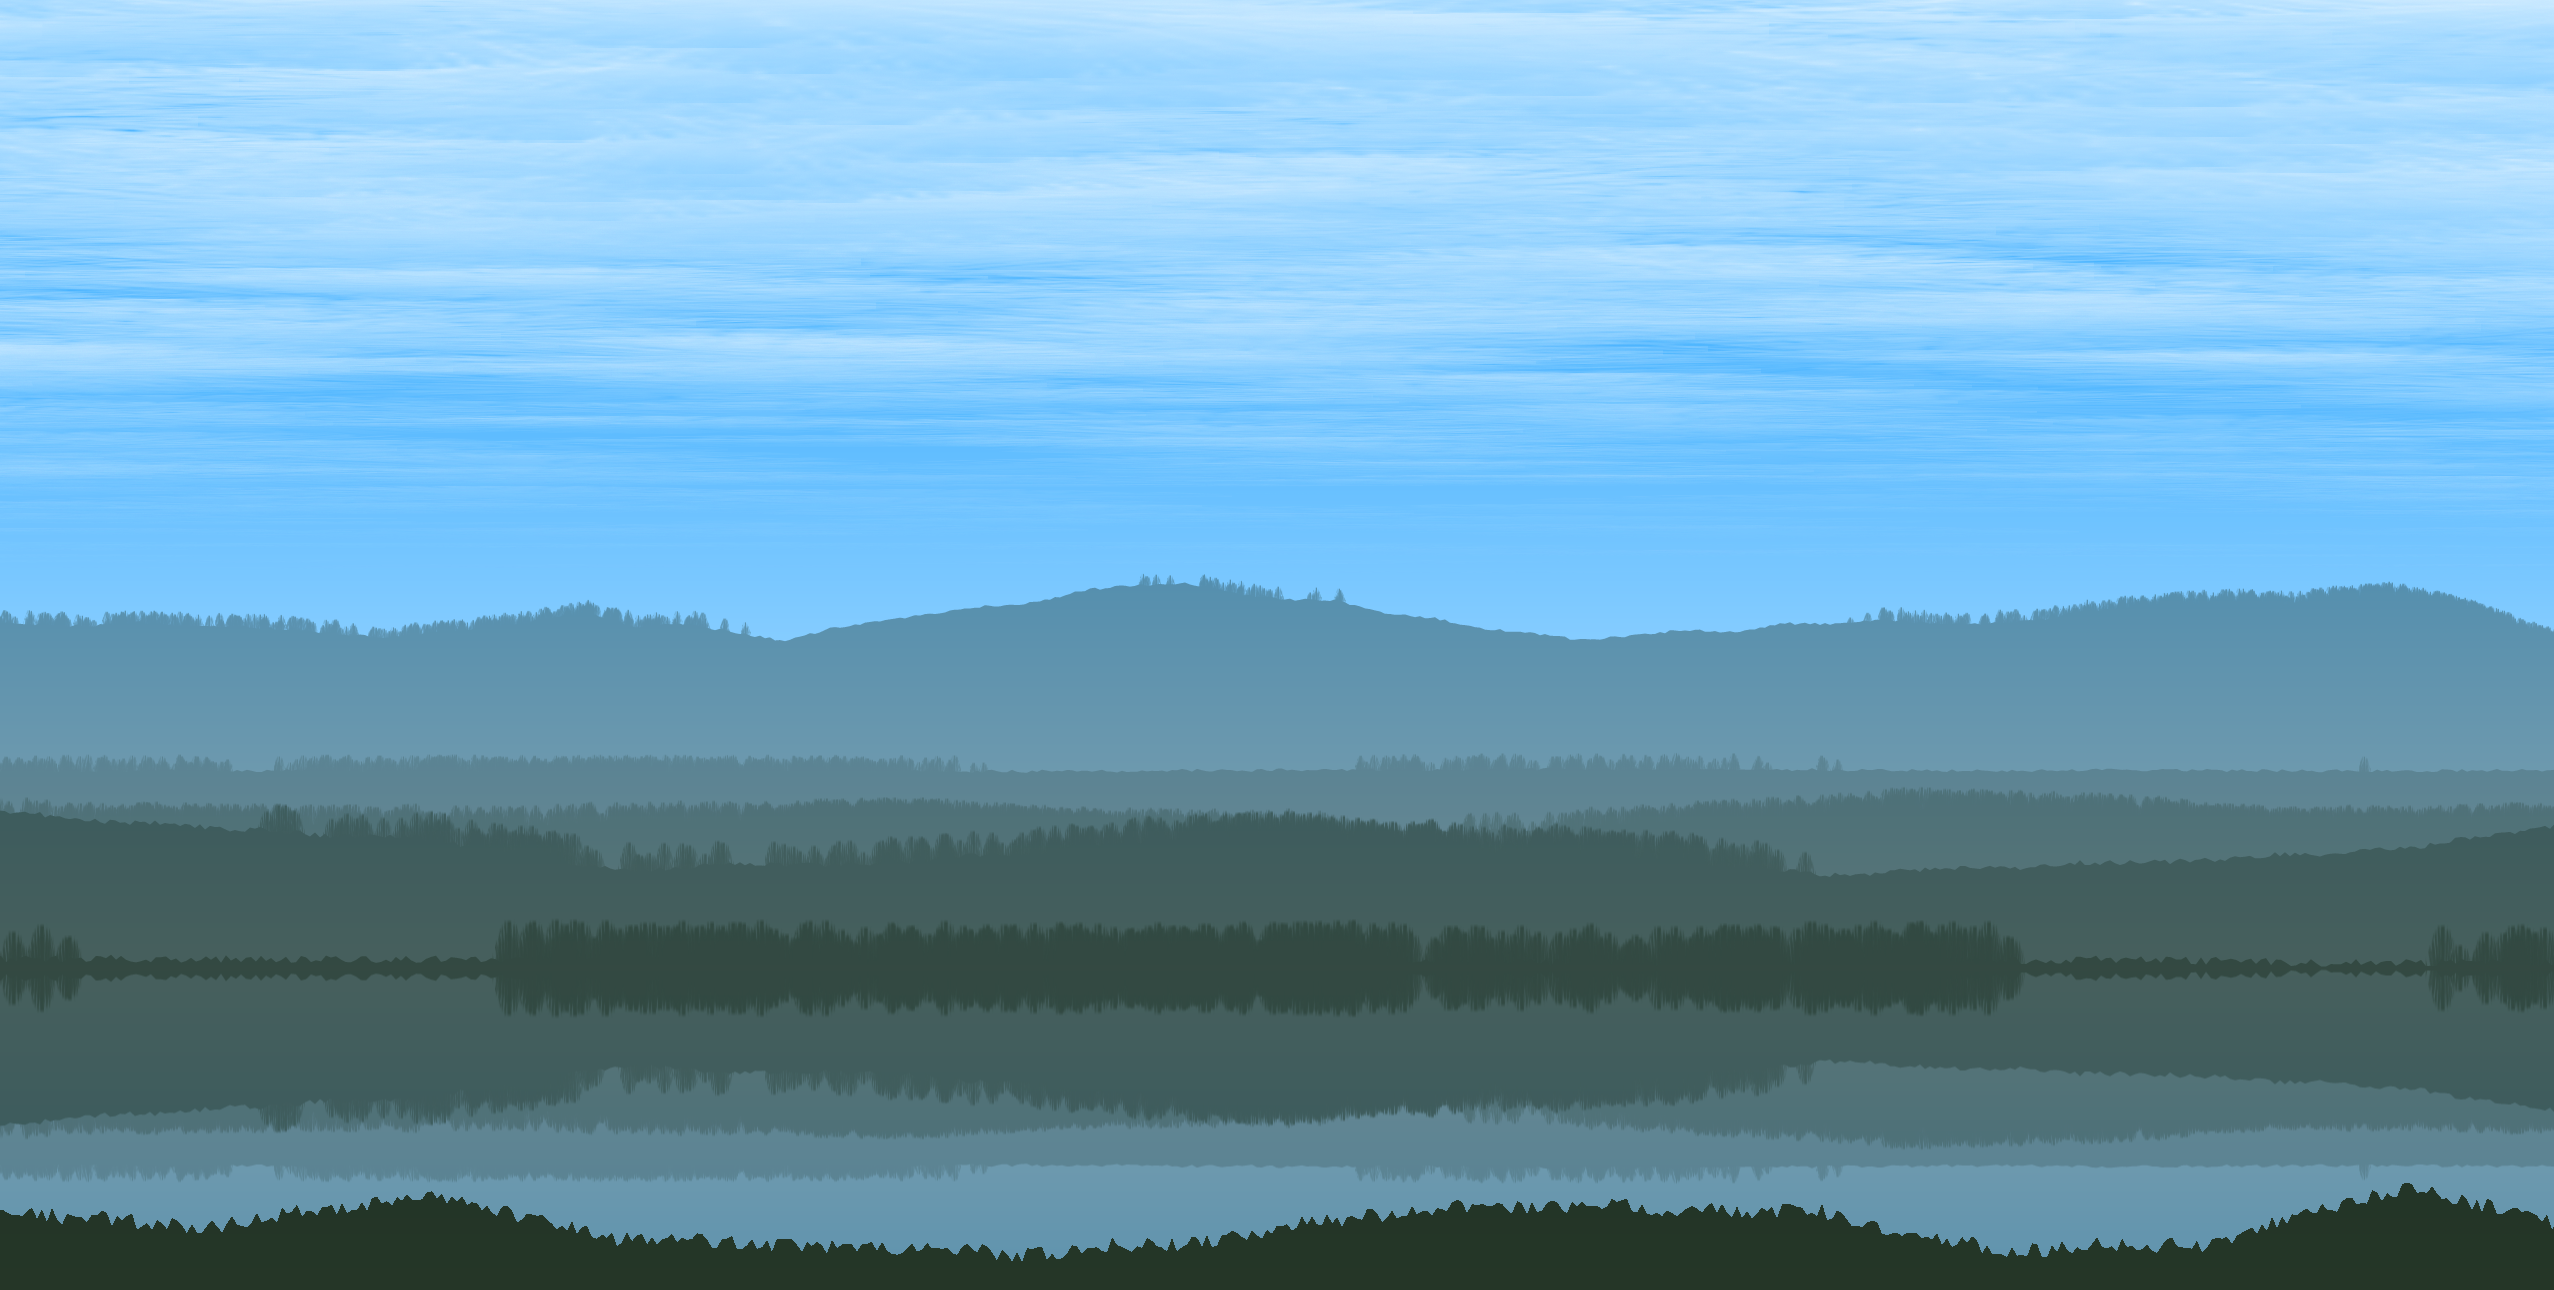
View of a passing procedural landscape from a train window in 1k of javascript.
for(_='[fB40@sBl$](k$ckjfor(``f=_0)+K6^iJa[wt]H0*Gf/1e4Fb[~~lE]+B[D/LZ30Y(7-i)/X0,Wo/2Vi*VWU--;)T]=S&&R);QMath.P),OPrandom()N*N, 0%",e+2GN+"%)"],
80 "10
*Psin(f
*Pcos(fs[lekjM o NjWWM,o$ySC(r/l%1*E=u=a[cnokO[dwak"#eee",s[gbAS[i]w=s[caLikWWWoOr=M;0< (r-=s=u[gCtk"2d"
i=-1;6>i++;)
,I-d*b-NZ *(1-F="hsl("+[200function(l){Ow[aCok1e4;fTc[tnakWo+IOc[slk1,-1)Q)d=o/8G(5K5*20K1G@0)O,oWh1,mO)t=WA=`f in l)selfB[0]+f[3D6]D16]]Sf},A(aOA(cOC=return E]-]++1]},setInterval(if(!t)`e=5+@ n=.6 h+
l "5
e*=4,m+1
{_bBSN;`M=H+@G(C=i*i/(J?8:2)OL=8GX(o=a[hg]Og=N,pu[hgSu[wtS6W
OA(120)Wm1,hO!iRw,f=Y0;fT`r=Y;f/9eRNQ_g*bOsp,Y*N*o/b-2GV,F*V-VWV+N*VON*V)/4Qif(i){`u[wtSM,I=V+UJ||(I=.2ZYKg/2.5Rl=Z,NQ`M,5r QWoO$kOs[gbCpS"source-atop",n,l,OX9}}`
ca,-t*C,0OI=V-Un< .5Rb>.8Ri%2R(,ca,W2*UH,I,WI,H,IOQcBlckH*@-H*++t/1WWH,oOt%=@0},16)';g=/[- N-ZD-HJK_`jk$@B]/.exec(_);)with(_.split(g))_=join(shift());eval(_)
Code language: JavaScript (javascript)Full source code.
How it works
‘Minecraft’, the JS1k demo I wrote last year, is based on pixel manipulation of an imageData object. This means that most of its code consisted of direct bit-operations on colour values combined with a (pixel-based) voxel ray casting algorithm. I was familiar with this pixel-based image creation thanks to (old) DOS demo coding and, recently, the creation of glsl shaders on Shadertoy.
This year I wanted to try something new. I created a demo by drawing directly to the (HTML) canvas element using the high-level canvas element functions. This is the first time I made something using these functions, so there is probably a lot of improvement possible in the resulting code.
Global structure
The demo consists of a main function which is called every 16 milliseconds (using setInterval). Every time the main function is called, variable t is increased by one, looping from 0 to 400. The global structure of the main function is as follows:
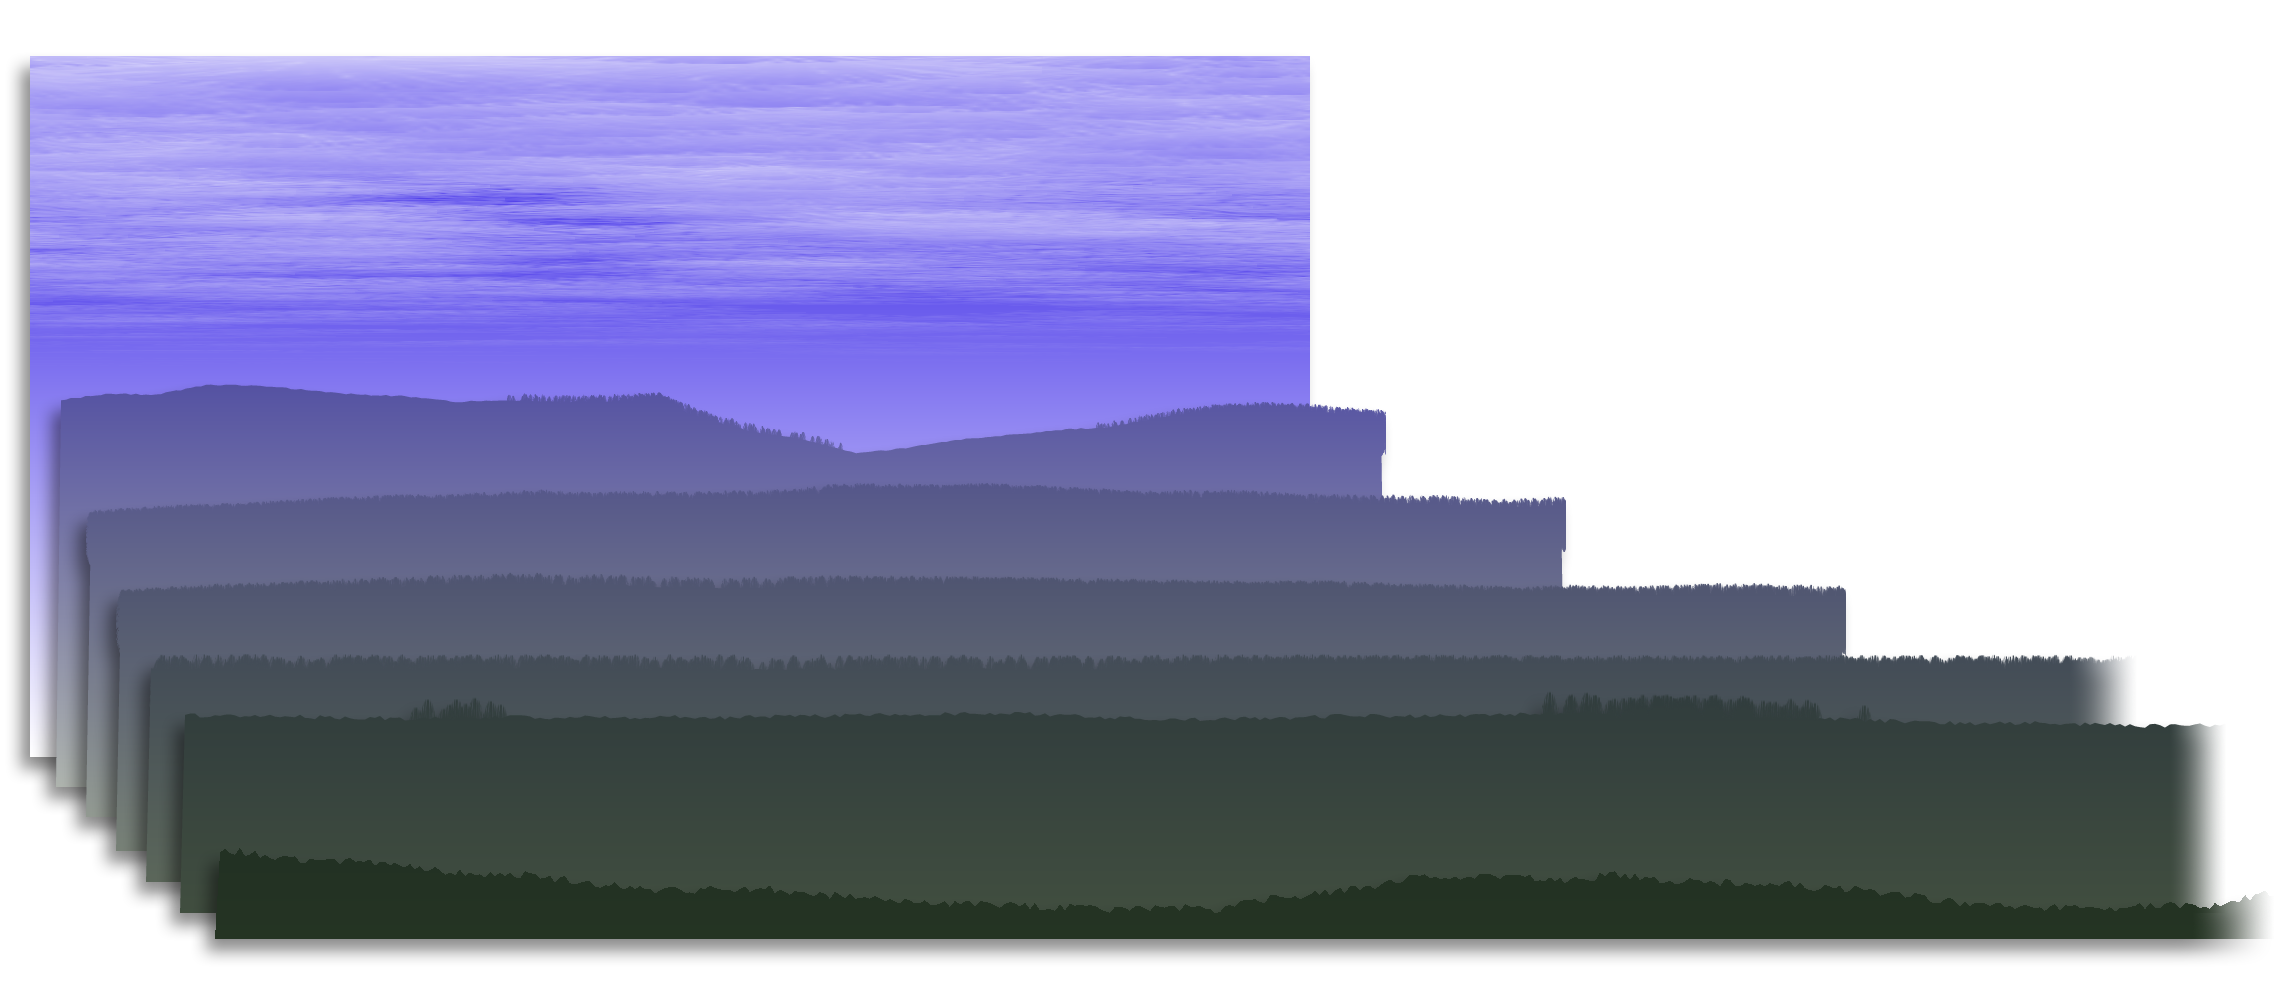
At t == 0 (every time the train enters the tunnel), seven layers a[i] are created:
- One background layer is rendered with a colour gradient, clouds, and (at nighttime) stars.
- Six foreground layers are rendered with a height map, trees, and (sometimes) snow.
Every time the main function is called, all seven layers a[i] (ordered from back to front) are copied into the canvas element. Each layer has a horizontal offset -t * N[i] based on time t and the distance to the viewer. These increasing offsets result in the parallax scrolling of the layers, suggesting a passing 3-dimensional landscape.
for (i = -1; 6 > i++;)
    c.drawImage(a[i], -t * N[i], 0),
    // reflections
    I = o / 2 - i * o / 20,
    n < .5 && b[i] > .8 && i%2 &&  (
      c.translate(0, o+I),
      c.scale(1, -1),
      c.drawImage(a, 0, 2*i * o / 20, a.width, I, 0, I, a.width, I),
      c.translate(0, o+I),
      c.scale(1, -1)
    );Code language: JavaScript (javascript)
Some layers are procedurally marked as ‘having water’ (b[i] > .8 && i%2). Immediately after copying such a layer to the canvas element, a copy of the canvas element itself is horizontally mirrored and copied into the same canvas element, just below the vertical offset of the current layer. This results in the illusion of a (perfectly) reflective surface of a lake. The remaining layers are copied on top after that.
Creating a layer
At t == 0 (every time the train enters the tunnel), seven layers a[i] are rendered. First, three colours h, l, m are initialized:
e = 5+40 * Math.random(),
// h is the color of the top of the sky gradient
h = "hsl(" + [200 + 80 * Math.random(), "100%", e + 20 * Math.random() + "%)"],
// l is the color that will be used to tone the foreground layers
l = "hsl(" + [200 * Math.random(), "50%", e + 20 * Math.random()+"%)"],
e *= 4,
// m is the color of the bottom of the sky gradient
m = "hsl(" + [200 + 180 * Math.random(), "100%", e + 20 * Math.random() + "%)"],Code language: JavaScript (javascript)
These three colours will mostly define what the landscape will look like until the next tunnel is reached. Now, for each layer i, a canvas element a[i] is created:
a[i] = z = a.cloneNode(),
s = z.getContext("2d"),Code language: JavaScript (javascript)
All layers have different widths. The background layer a[0] has exactly the width of the main canvas element a. The foreground layers are much wider to allow for parallax scrolling.
The background layer (a[0]) is filled with a gradient h,m. Stars are added if it is dark enough (80>e):
s.fillStyle = "#eee", f = 1e4; f--;)
s.fillRect( M *  Math.random(), o*Math.random(), Math.random(),  80>e && Math.random() );Code language: JavaScript (javascript)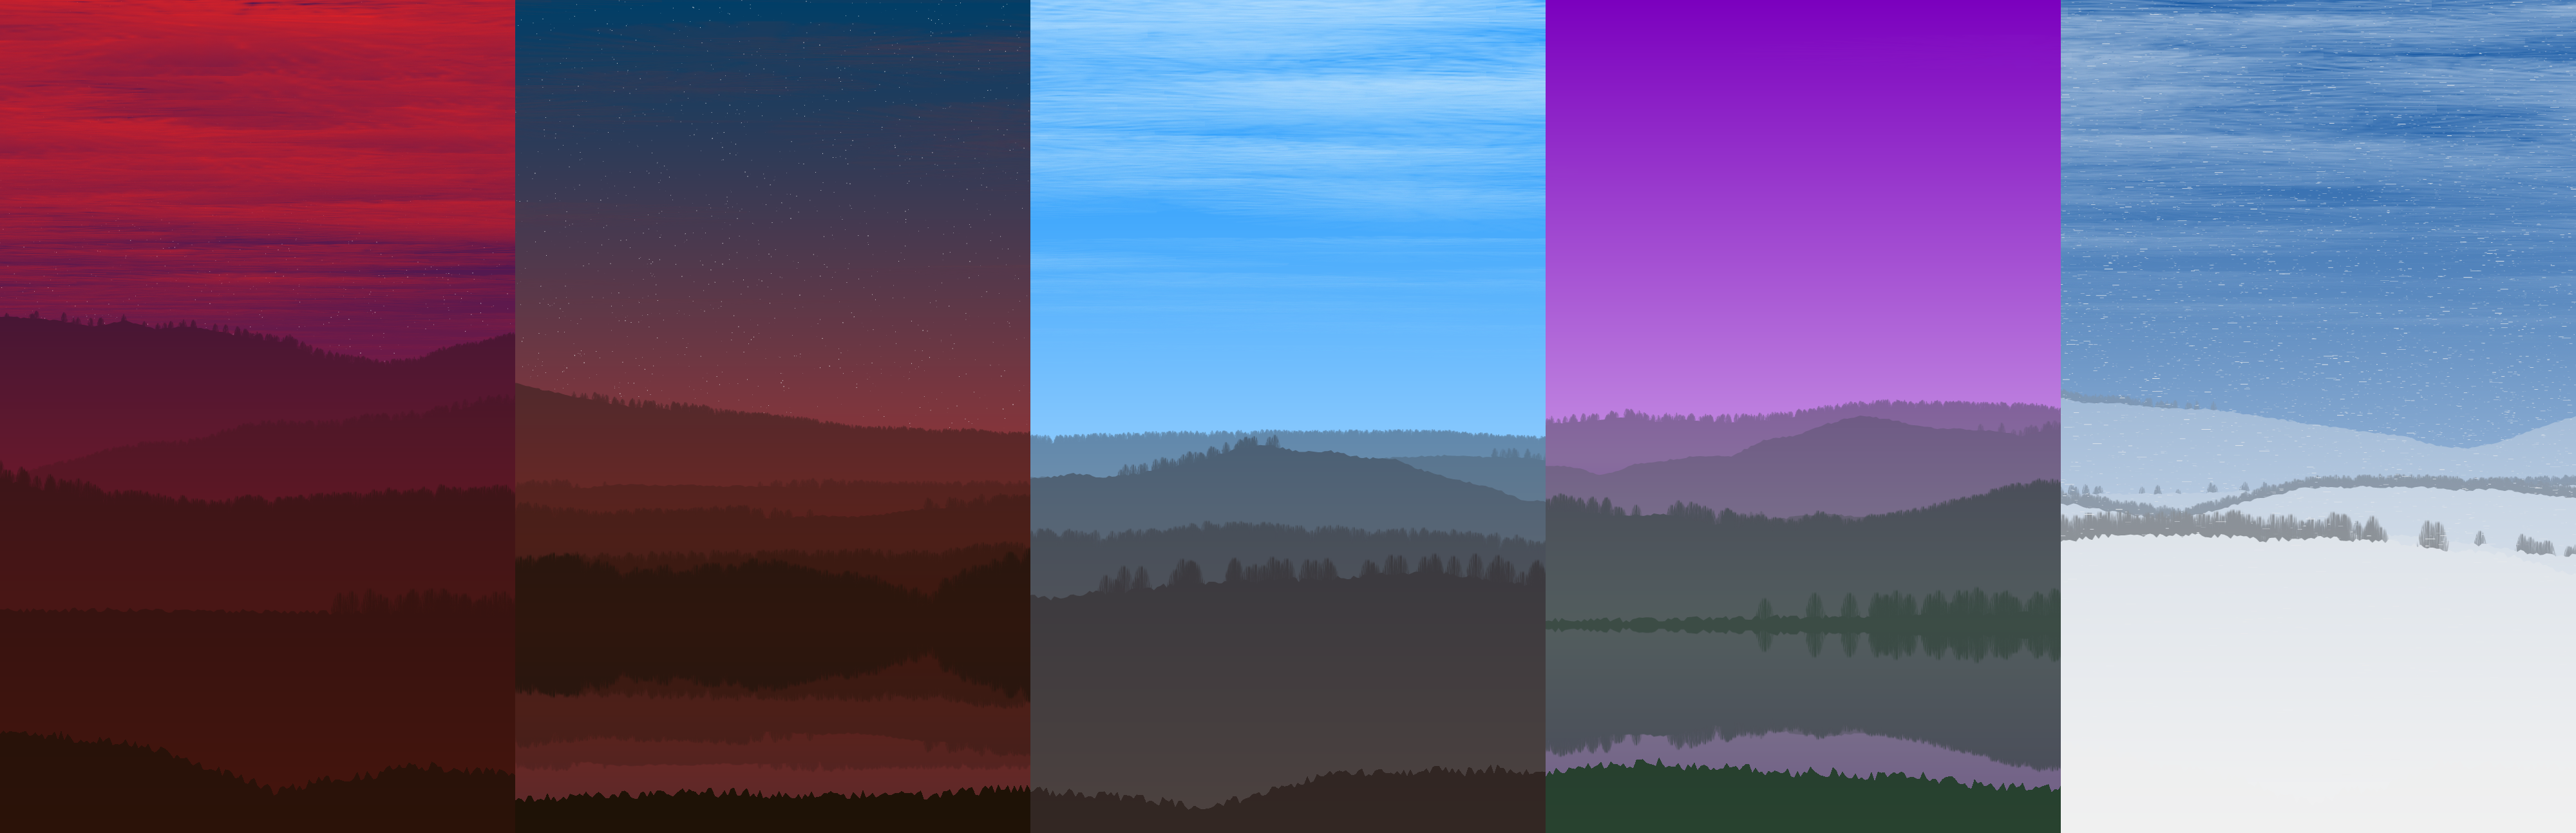
For each layer, a second, smaller (60×60), canvas element is created and filled with a star-like image:
s.fillStyle = !i&&w,
f = 300; f--;)
for (x = 30; f / 9 < x--;)
	s.fillRect(30 + x * Math.cos(f) * Math.cos(f * Math.sin(f)), 30 + x * Math.sin(f), .9, .9);Code language: JavaScript (javascript)

This second canvas will be used as a sprite. If i == 0 (the background layer), the fillStyle of the sprite is set to the same gradient as the sky, only vertically mirrored. This sprite will be used to render the clouds by stretching them and blending it (using a low opacity) into the background layer. For the other layers, the fillStyle of the sprite is black. In this case, the sprite will be used to render the trees.
For each foreground layer (i > 0) a height map is drawn to the layer using the following code:
for (
	s.lineTo(M, o),
	x = M; 0 < (x -= 5);)
		W = o/80 * (N(x / 50) + 5 * N(x / 200) + 10 * N(x / 400)),
		s.lineTo(x, I - W * b[i] - Math.random() / S);
	s.lineTo(0, o),
	s.fill(),Code language: JavaScript (javascript)
With M the width and o the height of the layer, and S a scaling factor proportional to the aspect ratio of the canvas. Note that it is (apparently) not necessary to call beginPath(), moveTo() or closePath().
As you can see, the total height W of the height map for point x is calculated by adding different frequencies of function N(x):
N = function(l) {
	return b[~~l] -l%1 * b[~~l] + l%1 * b[~~l+1]
},Code language: JavaScript (javascript)
N(x) gives the linear interpolation of values b[floor(x)] and b[floor(x+1)] of two values in array b (b is filled with different random values every time a layer is created). By adding different (scaled) values of N for different frequencies (based on x), a linear interpolated fbm is constructed and used as height.
This same function N is used for the placement of trees. A tree will be placed at position x if:
N(x / 300) + g/2 < Math.random()
With g a random value (initialized once per layer) indicating the ‘amount of trees’ for the layer. By placing the trees randomly but proportional to a linear fluctuating value based on x, natural-looking groups of trees arise.
After drawing the height map to the layer and adding trees (and snow), each layer is coloured. The colour of a layer is based on colour tone l and blended with background colour gradient h,m. The opacity of this gradient is based on i: for layers in the back, the opacity will be greater, giving a more foggy look and suggesting aerial perspective.
s.globalCompositeOperation = "source-atop",
// Tone layer using color l
s.globalAlpha = n,
s.fillStyle = l,
s.fillRect(0, 0, M, o),

// Blend sky gradient h,m into layer
s.globalAlpha = (7-i)/9,
s.fillStyle = w = s.createLinearGradient(0, 0, 0, o),
w.addColorStop(0, h),
w.addColorStop(1, m),
s.fillRect(0, 0, M, o)Code language: JavaScript (javascript)
Fit it into 1024 bytes
I started this demo by writing a fully-featured demo without worrying too much about the code size. Only after all features were implemented did I begin optimizing for size. I doubt if this is the most efficient way to write a JS1k demo (it might be better to try to write optimized code from the start), but because I was not familiar with the canvas functions I wanted to use, this seemed the most obvious way for me to work.
In the process of optimizing, I gained some bytes by removing features I originally wanted (poles with wires), reusing variables, and using global, already existing objects (a, b, c) as arrays.
However, most bytes were won by ‘pleasing the packer‘. I used RegPack as the final packer for my demo. RegPack looks for identical patterns in the code, replacing every extra occurrence with just one byte. Therefore, I kept looking at my code and tried to make it as repeating and redundant as I could (for example: look at the code used to initialize the three colours h, l, m given above).
Hashing properties and methods
One last trick I used is hashing property- and method names of objects, using a hash function H:
H = function(l) {
	for(f in l) self[f[0]+f[3]+[f[6]]+[f[16]]]=f
},Code language: JavaScript (javascript)
After calling this function with an object (H(s) for example), all names of the properties and methods of the object are stored in global variables with small names. So this piece of code:
s.globalCompositeOperation = "source-atop",
s.globalAlpha = n,
s.fillStyle = l,
s.fillRect(0, 0, M, o),Code language: JavaScript (javascript)
can be shortened to:
s[gbCp] = "source-atop",
s[gbA] = n,
s[fly] = l,
s[flc](0, 0, M, o),Code language: JavaScript (javascript)
Tools used
I used an online javascript compression tool to remove white spaces and semicolons and compressed the code using the (excellent) compression tool: Regpack 3.
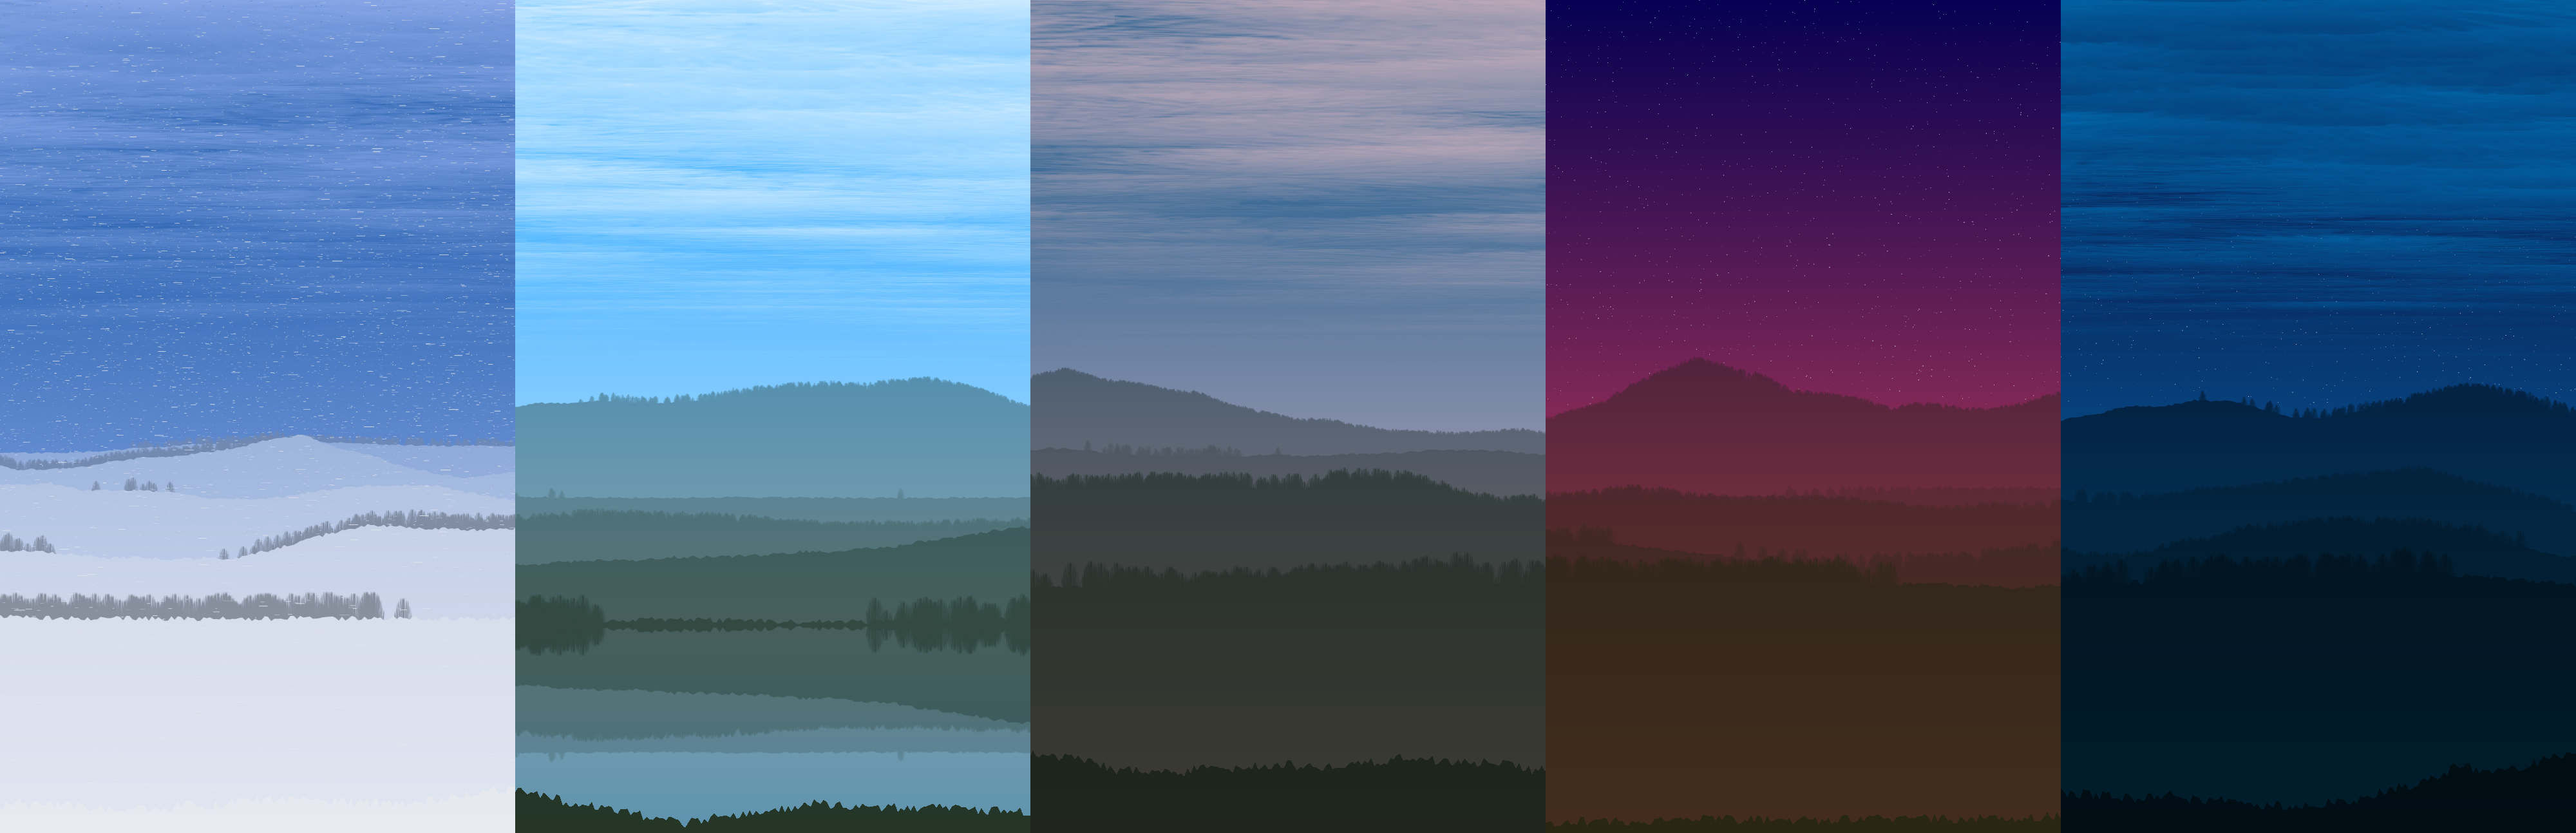
Some considerations
I wanted the demo to look beautiful and diverse. So, instead of adding more features, I used some bytes to make the demo independent of the size or aspect ratio of the browser window by always using the same vertical FOV. I also spent some bytes at (procedurally) varying the amount of ‘haze’ (for the aerial perspective), the number of trees per layer, the scale of the mountains per layer, the amount and opacity of the clouds (a subtle) color toning of the foreground layers and preventing lakes in scenes with snow.
I also wanted the demo to run in all major browsers (chrome, firefox, safari, internet explorer) on both Windows and OS X. This resulted in a rather complex hashing function H (because all browsers have different collisions with smaller hash functions I could think of), resulting in more code needed for the function itself and larger variable names of the hashed property- and method names.
The code would be much smaller if I had only targeted chrome and safari. And if I had also limited the canvas size to a fixed width and height, I think it would have been possible to add the poles and wires I originally wanted in my demo. But then it wouldn’t look as good in internet explorer or firefox as it does now ;).
You can find the full source code of my submission on GitHub: https://github.com/reindernijhoff/js1k/tree/master/2015_train
Similar posts
If you like this post, you may also like one of my other posts:
- JS1k post-mortem Minecraft
- Wolfenstein: Ray Tracing On using WebGL1
- Townscaper’s rendering style in WebGL
- Dittytoy
- WebGL Lightmapping Demo